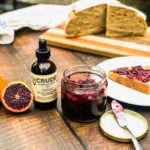
Blood Orange Manhattan Marmalade
How do you make your morning toast feel special? With this Blood Orange Manhattan Marmalade, that's how. Hints of cherry, bourbon, and bitters elevate this marmalade into something downright complex and alluring.
Ingredients
- 2 lbs blood oranges
- 1 lemon
- 12 oz pitted dark cherries frozen is easiest
- 4 cups water
- 5 cups sugar
- 1 cup Bourbon inexpensive, like "Very Old Barton"
- 20-40 dashes Bitters of choice Crude "Lindsay" or Angostura
Instructions
- Wash and dry oranges and lemon.
- Slice blood oranges into thin (⅛ inch) slices on a mandolin. Stop every few slices to check for seeds and pick out with a paring knife as needed. (This is admittedly tedious and shouldn’t be rushed because mandolins are sharp, but they are also the best way to cut thin slices like this. You could do this by hand with a sharp knife and TONS of patience, but a mandolin really is worth your sanity here.)
- Cut slices into quarters. Set the end slices of the oranges off to the side while you work. Once all the oranges are sliced and quartered, use a paring knife to trim off the extra pith (white) from the end pieces and then julienne the ends into thin slices. Add to the rest of the sliced and quartered oranges.
- Zest and juice 1 lemon over the oranges. Transfer oranges into a large pot. Add the 4 cups water. Stir to combine, keeping an eye out for any seeds you might have missed that float to the top. Turn heat to medium-high and bring mixture to a rolling boil. Once boiling, lower heat to a rapid simmer and cook for an additional 30 minutes, or until oranges have softened. Stir occasionally.
- While the oranges cook, set cherries out to thaw slightly. Then pulse a few times in a food processor or chop them roughly on a cutting board. Set aside.
- Place a couple small plates in the freezer to chill - you will use these later to test whether the marmalade will set.
- If you plan to can and preserve your marmalade (recommended), then this is the time to prep your canning supplies. Fill a large 12-quart pot with water ⅔ to ¾ full. Bring to a boil. Place 8 8-ounce jars into the water (or 6 10-ounce jars), as well as the jar rings, funnel, and ladle you plan to use into the boiling water and boil for 10 minutes. Turn off the heat. Add the lids to the hot water and leave everything in this pot of hot water until you are ready to start the canning process.
- After the oranges have simmered for 30 minutes, add the chopped/pulsed cherries, 1 cup bourbon, 5 cups sugar and stir. Insert a candy or deep fry thermometer into the side of the pot. Bring mixture back to a rolling boil. Be careful not to let mixture boil over - you may have to lower the heat to avoid this.
- Boil until mixture reaches 222* F on the thermometer, stirring occasionally to make sure sugar isn’t burning to the bottom of the pot. In my experience, reaching the ideal temperature can take anywhere from 15 to 30 minutes, so just keep an eye on this and be patient.
- To test if the marmalade is ready, take one of the chilled plates from the freezer and put one teaspoon of the marmalade onto the plate. Let it sit for 30 seconds and then tilt the plate. The marmalade should look like a soft gel and move a bit, but if it runs easily, then it’s not ready and needs to be boiled for longer. Repeat this test as often as needed until the proper setting consistency is reached. (This should be achieved at the 222* F temp, but the plate test will confirm the stage. You can also just use the plate test if you don’t have a candy thermometer.)
- Once the marmalade has reached the setting stage, add the bitters to taste. I used Crude Bitters “Lindsay” (Pecan, Magnolia, Habanero) and used two half-full droppers worth (about 40 drops) for one batch. Angostura bitters would also work well here. Start with 10 drops or dashes, stir well, and pull out a teaspoon to taste (make sure you let the marmalade cool on the spoon before tasting - it’s hot!). Continue this process until you’ve reached desired taste.
- Remove the sanitized canning jars from the hot water and drain on a clean kitchen towel. Remove lids, rings, ladle and funnel as well and set in a clean, sterile place.
- Turn heat back on the canning pot to bring canning water back to a boil. Put funnel on top of one of the jars and ladle marmalade into jar, leaving about ½ to 1 inch of headspace. Wipe the rims and threads of the jar with a clean, slightly moist towel. Place lid on each jar and secure with a ring (don’t tighten too aggressively).
- Place jars in canning rack and lower into boiling water (you don't want the jars to sit directly on the bottom of the pot). Add additional water, if needed, to cover tops of jars by at least 1 inch. Process jars in boiling water for 10 minutes.
- Using canning tongs, carefully remove jars to a cool place and set on top of a kitchen towel. Allow to sit for 24 hours. Check seal by pressing on the lids. There should be no flex or pop. If a seal is not achieved, put that jar in the refrigerator and use that product first. Refrigerated marmalade should be safe for at least 3 months if tightly sealed between uses. Always check homemade jams and discard if mold or other signs of spoilage appear. Properly sealed jars can be stored in a cool, dry, dark place like a cupboard for 12 months. Make sure to label all jars with the content and date made.
Notes
Note: This is not a sponsored post, but I'm friends with the owners of Crude Bitters and love their products. If you're a local to the Triangle area of NC, you should definitely pay them a visit. And if you live outside the area, their wonderful bitters, like the Lindsay flavor I used in this marmalade are available to shop online!